重现步骤
import os
import ujson
import aicube
from media.sensor import *
from media.display import *
from media.media import *
from time import *
import nncase_runtime as nn
import ulab.numpy as np
import time
import utime
import image
import random
import gc
import utime
import network
import socket
import json
from machine import Pin
# 可选lcd或HDMI模式
display_mode="lcd"
if display_mode=="lcd":
DISPLAY_WIDTH = ALIGN_UP(800, 16)
DISPLAY_HEIGHT = 480
else:
DISPLAY_WIDTH = ALIGN_UP(1920, 16)
DISPLAY_HEIGHT = 1080
# 摄像头输出分辨率
OUT_RGB888P_WIDTH = ALIGN_UP(1080, 16)
OUT_RGB888P_HEIGH = 720
# 56种颜色盘
color_four = [(255, 220, 20, 60), (255, 119, 11, 32), (255, 0, 0, 142), (255, 0, 0, 230),
(255, 106, 0, 228), (255, 0, 60, 100), (255, 0, 80, 100), (255, 0, 0, 70),
(255, 0, 0, 192), (255, 250, 170, 30), (255, 100, 170, 30), (255, 220, 220, 0),
(255, 175, 116, 175), (255, 250, 0, 30), (255, 165, 42, 42), (255, 255, 77, 255),
(255, 0, 226, 252), (255, 182, 182, 255), (255, 0, 82, 0), (255, 120, 166, 157),
(255, 110, 76, 0), (255, 174, 57, 255), (255, 199, 100, 0), (255, 72, 0, 118),
(255, 255, 179, 240), (255, 0, 125, 92), (255, 209, 0, 151), (255, 188, 208, 182),
(255, 0, 220, 176), (255, 255, 99, 164), (255, 92, 0, 73), (255, 133, 129, 255),
(255, 78, 180, 255), (255, 0, 228, 0), (255, 174, 255, 243), (255, 45, 89, 255),
(255, 134, 134, 103), (255, 145, 148, 174), (255, 255, 208, 186),
(255, 197, 226, 255), (255, 171, 134, 1), (255, 109, 63, 54), (255, 207, 138, 255),
(255, 151, 0, 95), (255, 9, 80, 61), (255, 84, 105, 51), (255, 74, 65, 105),
(255, 166, 196, 102), (255, 208, 195, 210), (255, 255, 109, 65), (255, 0, 143, 149),
(255, 179, 0, 194), (255, 209, 99, 106), (255, 5, 121, 0), (255, 227, 255, 205),
(255, 147, 186, 208), (255, 153, 69, 1), (255, 3, 95, 161), (255, 163, 255, 0),
(255, 119, 0, 170), (255, 0, 182, 199), (255, 0, 165, 120), (255, 183, 130, 88),
(255, 95, 32, 0), (255, 130, 114, 135), (255, 110, 129, 133), (255, 166, 74, 118),
(255, 219, 142, 185), (255, 79, 210, 114), (255, 178, 90, 62), (255, 65, 70, 15),
(255, 127, 167, 115), (255, 59, 105, 106), (255, 142, 108, 45), (255, 196, 172, 0),
(255, 95, 54, 80), (255, 128, 76, 255), (255, 201, 57, 1), (255, 246, 0, 122),
(255, 191, 162, 208)]
# 文件路径包括模型,类别
root_path="/sdcard/mp_deployment_source/"
config_path=root_path+"deploy_config.json"
deploy_conf={}
debug_mode=1
# 性能分析类 - 使用上下文管理器测量代码块执行时间
class ScopedTiming:
def __init__(self, info="", enable_profile=True):
self.info = info
self.enable_profile = enable_profile
def __enter__(self):
if self.enable_profile:
self.start_time = time.time_ns()
return self
def __exit__(self, exc_type, exc_value, traceback):
if self.enable_profile:
elapsed_time = time.time_ns() - self.start_time
print(f"{self.info} took {elapsed_time / 1000000:.2f} ms")
# 使用ujson快速解析JSON配置文件
def read_deploy_config(config_path):
# 打开JSON文件以进行读取deploy_config
with open(config_path, 'r') as json_file:
try:
# 从文件中加载JSON数据
config = ujson.load(json_file)
# 打印数据(可根据需要执行其他操作)
#print(config)
except ValueError as e:
print("JSON 解析错误:", e)
return config
# 主检测函数
def detection():
# 获取服务器地址和端口号
ai = socket.getaddrinfo('10.0.1.42', 8086)
print("Address infos:", ai)
addr = ai[0][-1]
print("Connect address:", addr)
# 创建 UDP 套接字
s = socket.socket(socket.AF_INET, socket.SOCK_DGRAM)
# 将 Pin2 实例化为输出模式,并配置为无上下拉(PULL_NONE),驱动能力为 7
pin = Pin(10, Pin.IN, pull=Pin.PULL_NONE, drive=7)
print("det_infer start")
# 使用json读取内容初始化部署变量
deploy_conf=read_deploy_config(config_path)
kmodel_name=deploy_conf["kmodel_path"]
labels=deploy_conf["categories"]
confidence_threshold= deploy_conf["confidence_threshold"]
nms_threshold = deploy_conf["nms_threshold"]
img_size=deploy_conf["img_size"]
num_classes=deploy_conf["num_classes"]
nms_option = deploy_conf["nms_option"]
model_type = deploy_conf["model_type"]
if model_type == "AnchorBaseDet":
anchors = deploy_conf["anchors"][0] + deploy_conf["anchors"][1] + deploy_conf["anchors"][2]
kmodel_frame_size = img_size
frame_size = [OUT_RGB888P_WIDTH,OUT_RGB888P_HEIGH]
strides = [8,16,32]
# 计算padding值
ori_w = OUT_RGB888P_WIDTH;
ori_h = OUT_RGB888P_HEIGH;
width = kmodel_frame_size[0];
height = kmodel_frame_size[1];
ratiow = float(width) / ori_w;
ratioh = float(height) / ori_h;
if ratiow < ratioh:
ratio = ratiow
else:
ratio = ratioh
new_w = int(ratio * ori_w);
new_h = int(ratio * ori_h);
dw = float(width - new_w) / 2;
dh = float(height - new_h) / 2;
top = int(round(dh - 0.1));
bottom = int(round(dh + 0.1));
left = int(round(dw - 0.1));
right = int(round(dw - 0.1));
# init kpu and load kmodel
kpu = nn.kpu()
ai2d = nn.ai2d()
kpu.load_kmodel(root_path+kmodel_name)
ai2d.set_dtype(nn.ai2d_format.NCHW_FMT,
nn.ai2d_format.NCHW_FMT,
np.uint8, np.uint8)
ai2d.set_pad_param(True, [0,0,0,0,top,bottom,left,right], 0, [114,114,114])
ai2d.set_resize_param(True, nn.interp_method.tf_bilinear, nn.interp_mode.half_pixel )
ai2d_builder = ai2d.build([1,3,OUT_RGB888P_HEIGH,OUT_RGB888P_WIDTH], [1,3,height,width])
# 初始化并配置sensor
sensor = Sensor()
sensor.reset()
# 设置镜像
sensor.set_hmirror(True)
# 设置翻转
sensor.set_vflip(True)
# 通道0直接给到显示VO,格式为YUV420
sensor.set_framesize(width = DISPLAY_WIDTH, height = DISPLAY_HEIGHT)
sensor.set_pixformat(PIXEL_FORMAT_YUV_SEMIPLANAR_420)
# 通道2给到AI做算法处理,格式为RGB888
sensor.set_framesize(width = OUT_RGB888P_WIDTH , height = OUT_RGB888P_HEIGH, chn=CAM_CHN_ID_2)
sensor.set_pixformat(PIXEL_FORMAT_RGB_888_PLANAR, chn=CAM_CHN_ID_2)
# 绑定通道0的输出到vo
sensor_bind_info = sensor.bind_info(x = 0, y = 0, chn = CAM_CHN_ID_0)
Display.bind_layer(**sensor_bind_info, layer = Display.LAYER_VIDEO1)
if display_mode=="lcd":
# 设置为ST7701显示,默认800x480
Display.init(Display.ST7701, to_ide = True)
else:
# 设置为LT9611显示,默认1920x1080
Display.init(Display.LT9611, to_ide = True)
#创建OSD图像
osd_img = image.Image(DISPLAY_WIDTH, DISPLAY_HEIGHT, image.ARGB8888)
try:
# media初始化
MediaManager.init()
# 启动sensor
sensor.run()
rgb888p_img = None
ai2d_input_tensor = None
data = np.ones((1,3,width,height),dtype=np.uint8)
ai2d_output_tensor = nn.from_numpy(data)
while True:
with ScopedTiming("total",debug_mode > 0):
# 发送UDP数据 gpio查询的状态
s.sendto(str(pin.value()).encode(), addr)
# 获取图像帧
rgb888p_img = sensor.snapshot(chn=CAM_CHN_ID_2)
# print(f'图像帧 = {rgb888p_img}')
# for rgb888planar
if rgb888p_img.format() == image.RGBP888:
ai2d_input = rgb888p_img.to_numpy_ref()
ai2d_input_tensor = nn.from_numpy(ai2d_input)
ai2d_builder.run(ai2d_input_tensor, ai2d_output_tensor)
# 模型推理
kpu.set_input_tensor(0, ai2d_output_tensor)
# run kmodel
kpu.run()
# get output
results = []
for i in range(kpu.outputs_size()):
out_data = kpu.get_output_tensor(i)
result = out_data.to_numpy()
result = result.reshape((result.shape[0]*result.shape[1]*result.shape[2]*result.shape[3]))
del out_data
results.append(result)
gc.collect()
# 后处理
if model_type == "AnchorBaseDet":
det_boxes = aicube.anchorbasedet_post_process( results[0], results[1], results[2], kmodel_frame_size, frame_size, strides, num_classes, confidence_threshold, nms_threshold, anchors, nms_option)
elif model_type == "GFLDet":
det_boxes = aicube.gfldet_post_process( results[0], results[1], results[2], kmodel_frame_size, frame_size, strides, num_classes, confidence_threshold, nms_threshold, nms_option)
else:
det_boxes = aicube.anchorfreedet_post_process( results[0], results[1], results[2], kmodel_frame_size, frame_size, strides, num_classes, confidence_threshold, nms_threshold, nms_option)
osd_img.clear()
if det_boxes:
for det_boxe in det_boxes:
x1, y1, x2, y2 = det_boxe[2],det_boxe[3],det_boxe[4],det_boxe[5]
w = float(x2 - x1) * DISPLAY_WIDTH // OUT_RGB888P_WIDTH
h = float(y2 - y1) * DISPLAY_HEIGHT // OUT_RGB888P_HEIGH
osd_img.draw_rectangle(int(x1 * DISPLAY_WIDTH // OUT_RGB888P_WIDTH) , int(y1 * DISPLAY_HEIGHT // OUT_RGB888P_HEIGH) , int(w) , int(h) , color=color_four[det_boxe[0]][1:])
label = labels[det_boxe[0]]
#print(f'类别名称 : {label}')
score = str(round(det_boxe[1],2))
#print(f'百分比 : {score}')
osd_img.draw_string_advanced( int(x1 * DISPLAY_WIDTH // OUT_RGB888P_WIDTH) , int(y1 * DISPLAY_HEIGHT // OUT_RGB888P_HEIGH)-50,32, label + " " + score , color=color_four[det_boxe[0]][1:])
print(f'目标检测的信息 : {det_boxe}')
if float(score) > 0.8:
det_boxe.append(label)
# 发送UDP数据字符串
bytes_sent = s.sendto(json.dumps(det_boxe).encode(), addr)
print("Bytes sent:", bytes_sent)
Display.show_image(osd_img, 0, 0, Display.LAYER_OSD3)
gc.collect()
rgb888p_img = None
except Exception as e:
print(f"An error occurred during buffer used: {e}")
finally:
os.exitpoint(os.EXITPOINT_ENABLE_SLEEP)
del ai2d_input_tensor
del ai2d_output_tensor
#停止摄像头输出
sensor.stop()
#去初始化显示设备
Display.deinit()
#释放媒体缓冲区
MediaManager.deinit()
gc.collect()
time.sleep(1)
nn.shrink_memory_pool()
# 关闭套接字
s.close()
print("det_infer end")
return 0
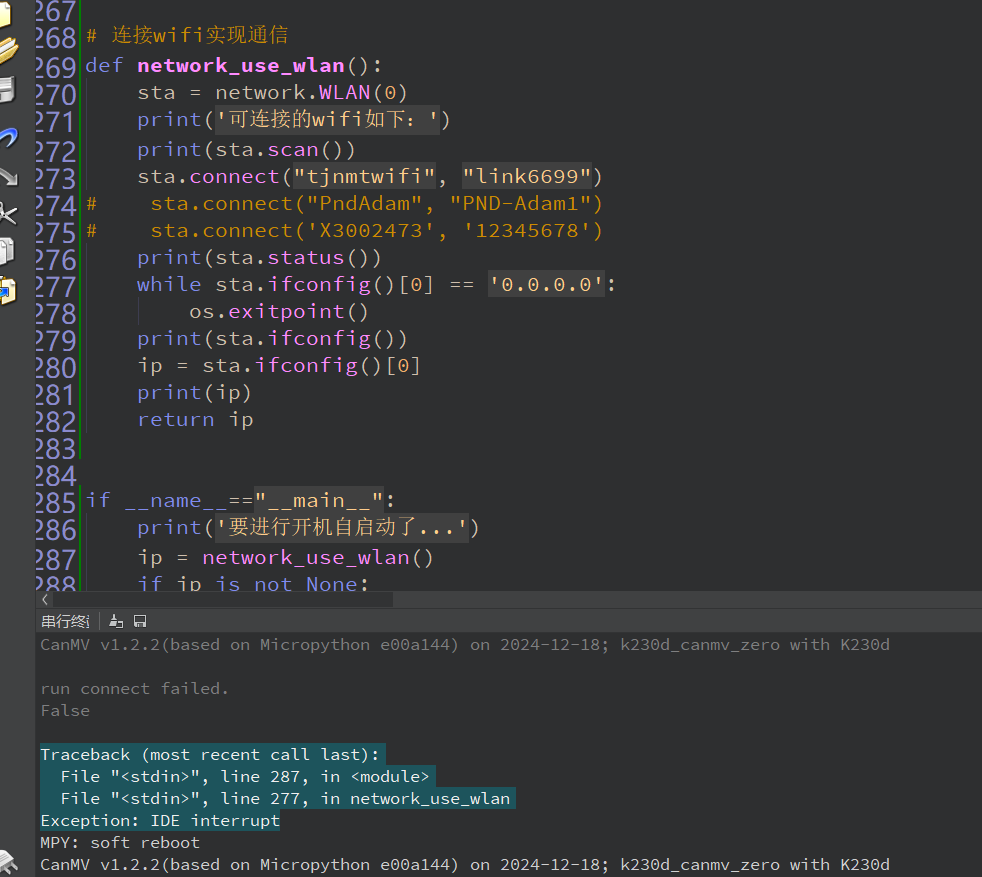
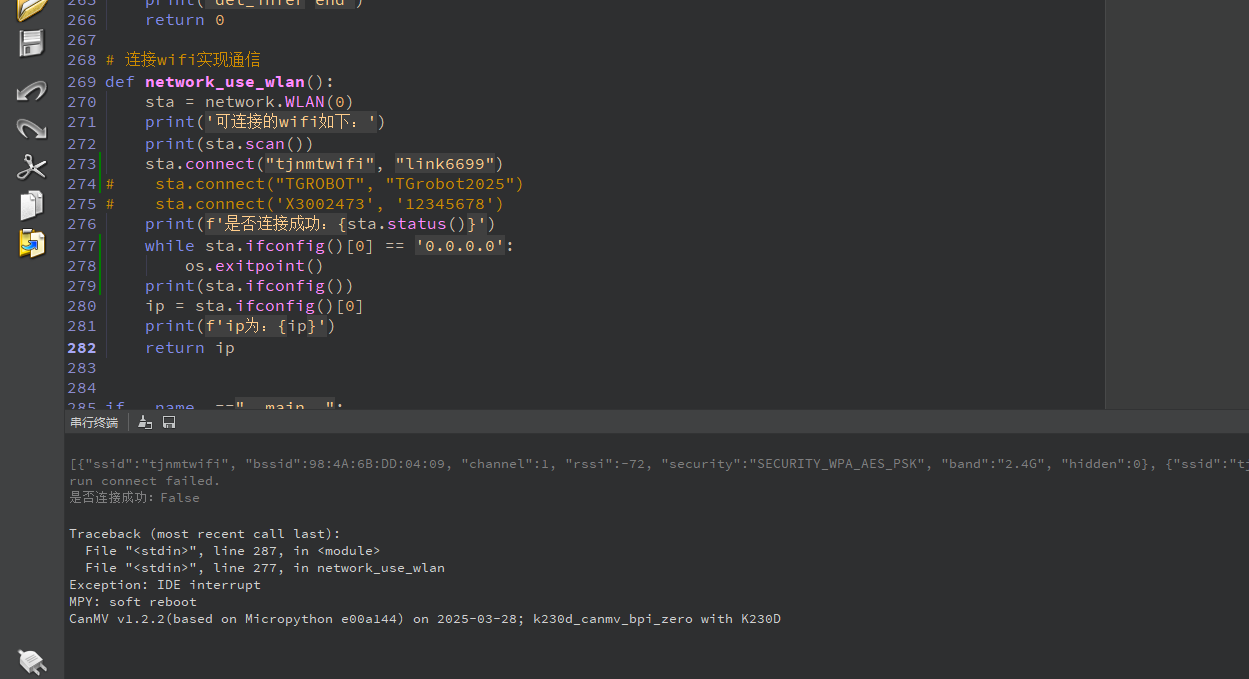
# 连接wifi实现通信
def network_use_wlan():
sta = network.WLAN(0)
print('可连接的wifi如下:')
print(sta.scan())
sta.connect("tjnmtwifi", "link6699")
# sta.connect("PndAdam", "PND-Adam1")
# sta.connect('X3002473', '12345678')
print(sta.status())
while sta.ifconfig()[0] == '0.0.0.0':
os.exitpoint()
print(sta.ifconfig())
ip = sta.ifconfig()[0]
print(ip)
return ip
if __name__=="__main__":
print('要进行开机自启动了...')
ip = network_use_wlan()
if ip is not None:
detection()
期待结果和实际结果
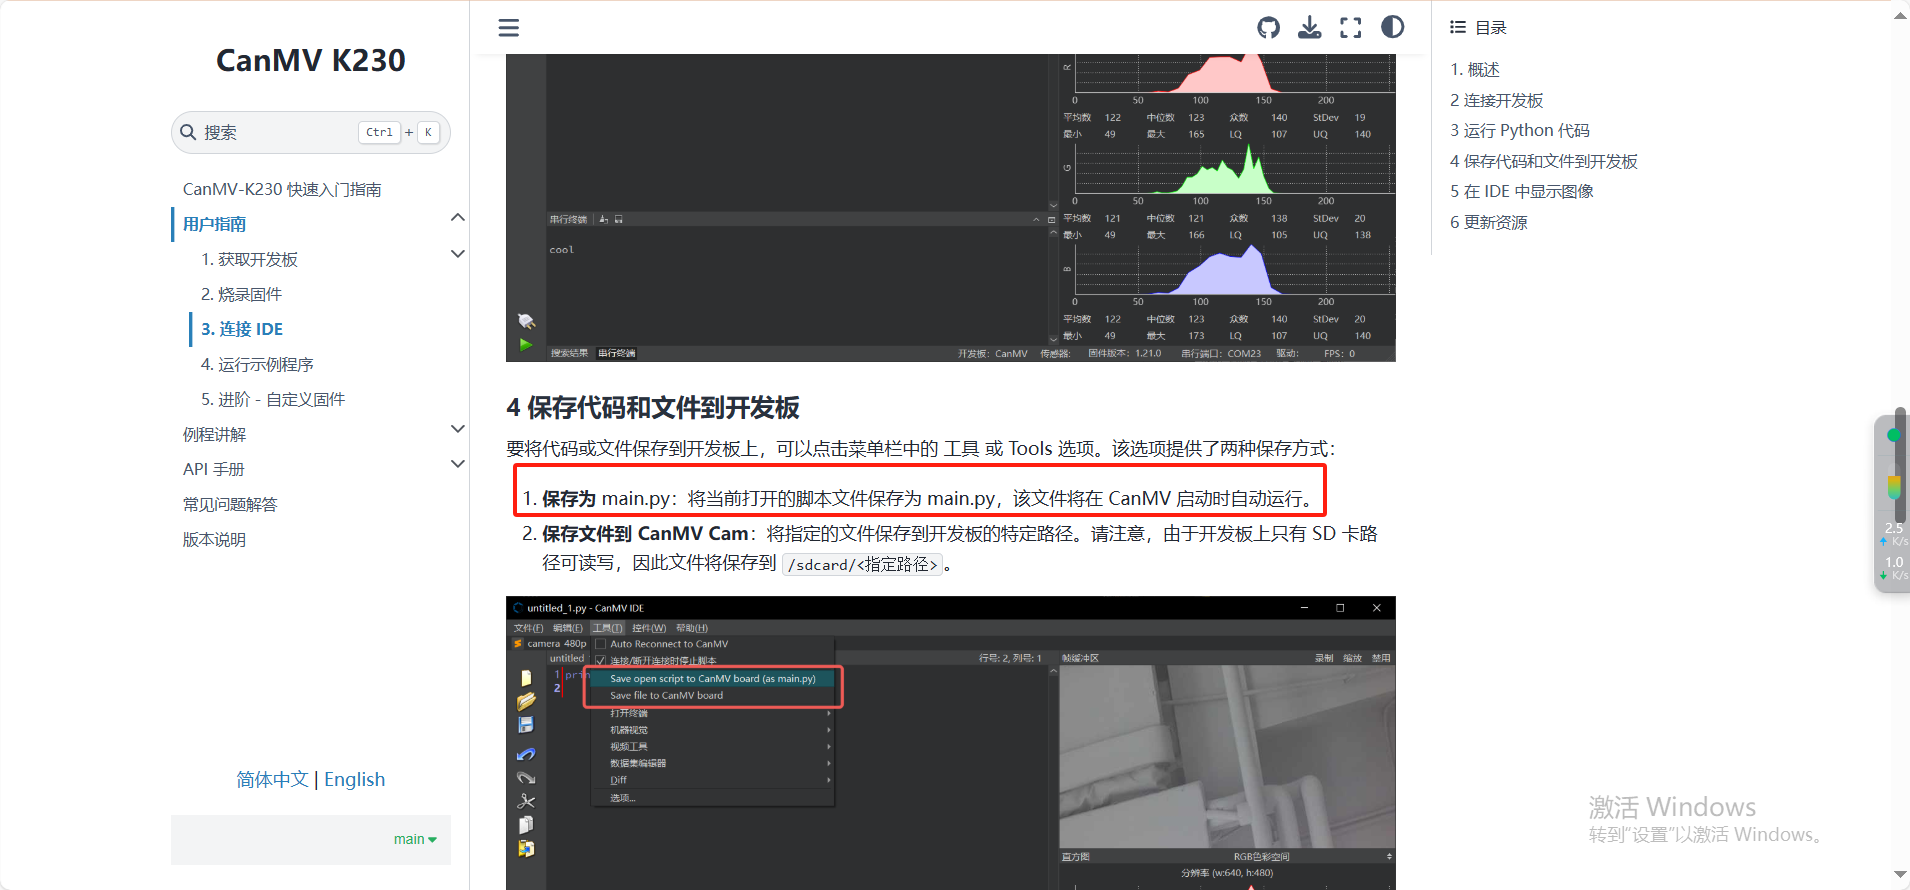
我这边做的具体需求是,目标检测到后通过UDP请求发送检测到的位置信息,再IDE中允许没有问题,想要给做成开发板启动后就执行这个程序
软硬件版本信息
使用的是K230D 的开发板
错误日志
Traceback (most recent call last):
File "", line 287, in
File "", line 277, in network_use_wlan
Exception: IDE interrupt
尝试解决过程
参考的是
补充材料