重现步骤
例程可以跑,但是用yolo大作战或者其他改写的程序换上自己的权重(已转kmodel)就会报错
array is too big。
软硬件版本信息
CanMV v1.2.2(based on Micropython e00a144) on 2024-12-18; k230_canmv_lckfb with K230
错误日志
Traceback (most recent call last):
File "", line 213, in
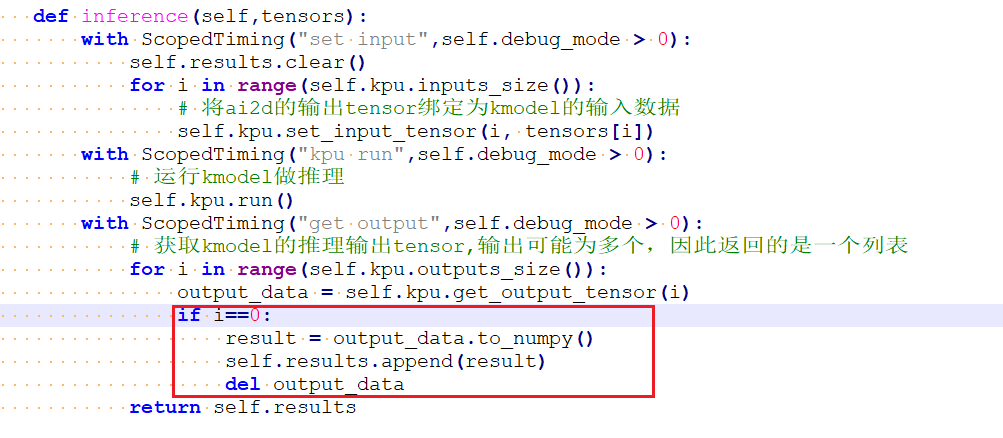
File "/sdcard/libs/AIBase.py", line 73, in run
File "/sdcard/libs/AIBase.py", line 59, in inference
ValueError: array is too big
尝试解决过程
用gpt查了说是可能超出内存,昨天改了一天,今天又一上午没搞出来。程序放下面了
补充材料
转kmodel时有警告,不知有没影响。
(yolov5) E:\PYTORCH_LEARNNING\yolov5\yolov5-6.1\test_yolov5\classify>python to_kmodel.py --target k230 --model ../../yolov5s.onnx --dataset ../../E_C_LABEL/images/test --input_width 640 --input_height 640 --ptq_option 0
warn: Nncase.Hosting.PluginLoader[0]
      NNCASE_PLUGIN_PATH is not set.
to_kmodel.py:25: DeprecationWarning: `mapping.TENSOR_TYPE_TO_NP_TYPE` is now deprecated and will be removed in a future release.To silence this warning, please use `helper.tensor_dtype_to_np_dtype` instead.
  input_dict['dtype'] = onnx.mapping.TENSOR_TYPE_TO_NP_TYPE[onnx_type.elem_type]
WARNING: The argument `input_shapes` is deprecated. Please use `overwrite_input_shapes` and/or `test_input_shapes` instead. An error will be raised in the future.
'''
实验名称:焊接缺陷检测(基于yolov5s)
实验平台:嘉立创 CanMV K230
'''
from libs.PipeLine import PipeLine, ScopedTiming
from libs.AIBase import AIBase
from libs.YOLO import YOLOv5
from libs.AI2D import Ai2d
from libs.Utils import *
import os
import ujson
from media.media import *
from time import *
import nncase_runtime as nn
import ulab.numpy as np
import time
import utime
import image
import random
import gc
import sys
import aidemo

# 自定义YOLOv5s检测类
class ObjectDetectionApp(AIBase):
    def __init__(self,kmodel_path,labels,model_input_size,max_boxes_num,confidence_threshold=0.5,
                 nms_threshold=0.2,rgb888p_size=[224,224],display_size=[1920,1080],debug_mode=0):
        super().__init__(kmodel_path,model_input_size,rgb888p_size,debug_mode)
        self.kmodel_path=kmodel_path
        self.labels=labels
        # 模型输入分辨率
        self.model_input_size=model_input_size
        # 阈值设置
        self.confidence_threshold=confidence_threshold
        self.nms_threshold=nms_threshold
        self.max_boxes_num=max_boxes_num
        # sensor给到AI的图像分辨率
        self.rgb888p_size=[ALIGN_UP(rgb888p_size[0],16),rgb888p_size[1]]
        # 显示分辨率
        self.display_size=[ALIGN_UP(display_size[0],16),display_size[1]]
        self.debug_mode=debug_mode
        # 检测框预置颜色值
        self.colors=get_colors(len(self.labels))
        # 宽高缩放比例
        self.x_factor = float(self.rgb888p_size[0])/self.model_input_size[0]
        self.y_factor = float(self.rgb888p_size[1])/self.model_input_size[1]
        # Ai2d实例,用于实现模型预处理
        self.ai2d=Ai2d(self.debug_mode)
        # 设置Ai2d的输入输出格式和类型
        self.ai2d.set_ai2d_dtype(nn.ai2d_format.NCHW_FMT,nn.ai2d_format.NCHW_FMT,np.uint8, np.uint8)
        # 配置预处理操作,这里使用了resize,Ai2d支持crop/shift/pad/resize/affine,具体代码请打开/sdcard/app/libs/AI2D.py查看
    def config_preprocess(self,input_image_size=None):
        with ScopedTiming("set preprocess config",self.debug_mode > 0):
            # 初始化ai2d预处理配置,默认为sensor给到AI的尺寸,您可以通过设置input_image_size自行修改输入尺寸
            ai2d_input_size=input_image_size if input_image_size else self.rgb888p_size
            print(f"Input image size: {ai2d_input_size}")  # 添加调试日志,检查输入尺寸
            self.ai2d.resize(nn.interp_method.tf_bilinear, nn.interp_mode.half_pixel)

            print(f"AI2D input size: {ai2d_input_size}")
            print(f"Model input size: {self.model_input_size}")

            # 确保 ai2d_input_size 与 model_input_size 一致
            if ai2d_input_size[0] != self.model_input_size[0] or ai2d_input_size[1] != self.model_input_size[1]:
                print("Warning: Input size mismatch!")
            if ai2d_input_size[0] * ai2d_input_size[1] > 4096:  # 根据实际设备的内存限制进行调整
                print(f"Warning: Input image size too large ({ai2d_input_size[0]} x {ai2d_input_size[1]})")
                # 可以尝试缩小输入尺寸

            # build参数包含输入shape和输出shape
            self.ai2d.build([1,3,ai2d_input_size[1],ai2d_input_size[0]],[1,3,self.model_input_size[1],self.model_input_size[0]])

## 初始化ai2d预处理配置,默认为sensor给到AI的尺寸,您可以通过设置input_image_size自行修改输入尺寸
#          ai2d_input_size=input_image_size if input_image_size else self.rgb888p_size
#          self.ai2d.resize(nn.interp_method.tf_bilinear, nn.interp_mode.half_pixel)
#          self.ai2d.build([1,3,ai2d_input_size[1],ai2d_input_size[0]],[1,3,self.model_input_size[1],self.model_input_size[0]])

    def postprocess(self,results):
        with ScopedTiming("postprocess",self.debug_mode > 0):
            print(f"Raw results: {results}")
            if len(results) > 5000:  # 假设5000是内存限制
                print("Warning: Results array too large!")
                return []

            result=results[0]
            result = result.reshape((result.shape[0] * result.shape[1], result.shape[2]))
            output_data = results[0][0]
            boxes_ori = output_data[:,0:4]
            score_ori = output_data[:,4]
            class_ori = output_data[:,5:]
            class_res=np.argmax(class_ori,axis=-1)
            scores_ = score_ori*np.max(class_ori,axis=-1)
            boxes,inds,scores=[],[],[]

            for i in range(len(boxes_ori)):
                if scores_[i]>self.conf_thresh:
                    x,y,w,h=boxes_ori[i][0],boxes_ori[i][1],boxes_ori[i][2],boxes_ori[i][3]
                    x1 = int((x - 0.5 * w)/self.scale)
                    y1 = int((y - 0.5 * h)/self.scale)
                    x2 = int((x + 0.5 * w)/self.scale)
                    y2 = int((y + 0.5 * h)/self.scale)
                    boxes.append([x1,y1,x2,y2])
                    inds.append(class_res[i])
                    scores.append(scores_[i])
            if len(boxes)==0:
                return []
            boxes = np.array(boxes)
            scores = np.array(scores)
            inds = np.array(inds)
            # NMS过程
            keep = self.nms(boxes,scores,self.nms_thresh)
            dets = np.concatenate((boxes, scores.reshape((len(boxes),1)), inds.reshape((len(boxes),1))), axis=1)
            det_res = []
            for keep_i in keep:
                det_res.append(dets[keep_i])
            det_res = np.array(det_res)
            det_res = det_res[:self.max_boxes_num, :]
            print(f"Processed boxes: {boxes}")
            return det_res


    # 绘制结果
    def draw_result(self,pl,dets):
        with ScopedTiming("display_draw",self.debug_mode >0):
            print(f"Detected {len(dets)} objects")  # 添加调试信息
            print("Clearing previous drawing")
            if dets:
                pl.osd_img.clear()
                for det in dets:
                    print(f"Drawing box: {det[:4]}")  # 打印检测框的坐标
                    x1, y1, x2, y2 = map(lambda x: int(round(x, 0)), det[:4])
                    print(f"Drawing box: ({x1}, {y1}), ({x2}, {y2})")
                    x= x1*self.display_size[0] // self.rgb888p_size[0]
                    y= y1*self.display_size[1] // self.rgb888p_size[1]
                    w = (x2 - x1) * self.display_size[0] // self.rgb888p_size[0]
                    h = (y2 - y1) * self.display_size[1] // self.rgb888p_size[1]
                    pl.osd_img.draw_rectangle(x,y, w, h, color=self.get_color(int(det[5])),thickness=4)
                    pl.osd_img.draw_string_advanced( x , y-50,32," " + self.labels[int(det[5])] + " " + str(round(det[4],2)) , color=self.get_color(int(det[5])))
            else:
                pl.osd_img.clear()


    # 多目标检测 非最大值抑制方法实现
    def nms(self,boxes,scores,thresh):
        """Pure Python NMS baseline."""
        x1,y1,x2,y2 = boxes[:, 0],boxes[:, 1],boxes[:, 2],boxes[:, 3]
        areas = (x2 - x1 + 1) * (y2 - y1 + 1)
        order = np.argsort(scores,axis = 0)[::-1]
        keep = []
        while order.size > 0:
            i = order[0]
            keep.append(i)
            new_x1,new_y1,new_x2,new_y2,new_areas = [],[],[],[],[]
            for order_i in order:
                new_x1.append(x1[order_i])
                new_x2.append(x2[order_i])
                new_y1.append(y1[order_i])
                new_y2.append(y2[order_i])
                new_areas.append(areas[order_i])
            new_x1 = np.array(new_x1)
            new_x2 = np.array(new_x2)
            new_y1 = np.array(new_y1)
            new_y2 = np.array(new_y2)
            xx1 = np.maximum(x1[i], new_x1)
            yy1 = np.maximum(y1[i], new_y1)
            xx2 = np.minimum(x2[i], new_x2)
            yy2 = np.minimum(y2[i], new_y2)
            w = np.maximum(0.0, xx2 - xx1 + 1)
            h = np.maximum(0.0, yy2 - yy1 + 1)
            inter = w * h
            new_areas = np.array(new_areas)
            ovr = inter / (areas[i] + new_areas - inter)
            new_order = []
            for ovr_i,ind in enumerate(ovr):
                if ind < thresh:
                    new_order.append(order[ovr_i])
            order = np.array(new_order,dtype=np.uint8)
        return keep


if __name__=="__main__":
    # 显示模式,默认"hdmi",可以选择"hdmi"和"lcd"

    display_mode="hdmi"
    if display_mode=="hdmi":
        display_size=[1920,1080]
    # 模型路径
    kmodel_path="/data/erc/best.kmodel"
    labels = ["loss", "stele", "shift"]
    # 其它参数设置
    confidence_threshold = 0.1
    nms_threshold = 0.5
    max_boxes_num = 0.5
    rgb888p_size=[640,640]

    # 初始化PipeLine
    pl=PipeLine(rgb888p_size=rgb888p_size,display_size=display_size,display_mode=display_mode)
    pl.create()
    # 初始化自定义目标检测实例
    ob_det=ObjectDetectionApp(kmodel_path,labels=labels,model_input_size=[640,640],
                              max_boxes_num=max_boxes_num,confidence_threshold=confidence_threshold,
                              nms_threshold=nms_threshold,rgb888p_size=rgb888p_size,display_size=display_size,debug_mode=0)
    ob_det.config_preprocess()

    clock = time.clock()

    while True:

            clock.tick()

            img=pl.get_frame() # 获取当前帧数据
            res=ob_det.run(img) # 推理当前帧
            ob_det.draw_result(pl,res) # 绘制结果到PipeLine的osd图像
            print(res)  # 打印当前结果
            pl.show_image() # 显示当前的绘制结果
            gc.collect()

            print(clock.fps()) #打印帧率